Materials & Applications
Braid Trim or Openwork Lace for a Structured Edge?
Choose the trim that produces the required finished edge on the actual garment layers. Braid is not automatically opaque or stiff, and openwork lace is not automatically soft. A decorative outline and structural support are different requirements: decide which the edge needs before comparing samples.
Separate the decorative line from edge support
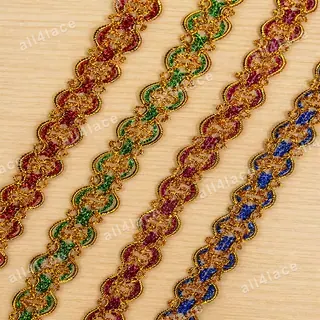
The photographed figure-eight bands have open centres through which the background is visible. Their gold-coloured outlines describe appearance, not metal content. The photo provides a design reference for the braid option; it is not a paired lace sample or a bending test.
Mark the intended finished edge, attachment path, exposed trim and any facing or lining on a sketch. A trim placed on top of a finished edge has a different role from one used to cover a raw edge. Do not assume the decorative band alone supplies the required support or conceals the seam allowance.
If a catalogue calls a braid “gimp”, ask which application the supplier has in mind. Trim catalogues use the term for clothing and home decoration. Upholstery examples can be fixed to furniture edges with adhesive or pins. For a garment order, ask for front and back photos of the same reference and identify where the stitch can hold the braid. Sew a short sample around the intended curve on your garment layers before approving the order.
Compare both samples against the same garment requirement
Place each candidate over the actual garment fabric and lining, then examine the proposed seam location. Nominal width alone does not tell you the visible coverage or the usable attachment margin. Use the following observations to decide what must be checked in a sewn sample.
| Requirement | Inspect on each candidate | Check after assembly |
|---|---|---|
| Coverage | Openings, motif spacing and the backing visible through them | Whether the intended backing or raw edge remains visible |
| Attachment | A suitable stitch path that avoids damaging decorative elements | Secure placement without an unwanted visible seam |
| Curves and corners | Whether the motif follows the planned edge without forced stretching | Flatness, joins and motif direction at the actual turn |
| Thickness and contact | Raised elements, reverse surface and layer overlap | Bulk at the join and contact with the intended adjacent material |
| Cut ends | Where the repeat can end and how the cut can be finished | An approved end treatment without an exposed or loose end |
Keep the finished target constant and record the sewing setup
Use the same edge shape, test length, garment fabric, lining and intended visible placement for both trials. Choose an attachment method appropriate to each candidate and record the stitch type, needle, thread, settings, attachment margin and any support. Forcing the same unsuitable stitch onto both materials does not make a useful buying comparison.
If you start with a common setup suitable for both, label it as the initial comparison. Keep each later adjustment as a separate labelled sample. Comparing the best approved assemblies answers which finished option works; it does not isolate the effect of the trim alone.
Coats identifies several interacting causes of seam puckering, including fabric, seam construction and sewing conditions. A wrinkled trial therefore needs diagnosis, not an automatic verdict against the material category.
Inspect front and reverse at straight sections, turns and ends. Handle the assembly as intended and record visible distortion, unwanted ridges or snagging. Any wash, wear or strength requirement needs a separately agreed test; a visual sewing trial does not establish those results.
Sources & further reading
Approve the construction before comparing the price
Hypothetical example: a cuff must show the dark backing through the trim while keeping a clear outer line. First compare openings on that backing, then sew each candidate at the same cuff shape. If a candidate needs a facing to meet the edge requirement, include that facing in its approved assembly. This is a decision sequence, not an All4Lace customer result or a claim that either material will pass.
Compare quotes for the same number of acceptable finished edges. Confirm whether the supply unit is metre, yard, roll or piece, and distinguish total width from usable placement width. Include the actual cut plan, joins, end finishing, added support and attachment work. Base waste on the verified layout; a lower price per metre alone does not establish a lower finished cost.
Keep a labelled edge sample and a comparable request
Record the product reference and colour, garment layers, finished edge sketch, visible width, attachment method, curve and end details, inspection findings and approved sample revision. Keep the rejected and adjusted versions identifiable so a quotation cannot silently refer to a different construction.
Specify quantities, the requested supply unit and which edge requirements remain untested. Confirm availability and the sampling arrangement for each reference; catalogue photographs do not guarantee that both options are currently available.
Discuss your embroidery project
Send All4Lace the intended edge sketch, garment-layer details and selected references. Request representative samples for the braid and lace options, and confirm the supply unit and sample arrangement before ordering.
Contact Zhijin